My Parent’s Bedroom Makeover – Striped Accent Wall Tutorial
I was recently working on a small budget commercial, but the hours were intense, and normally I am at a desk in front of a computer. However, this was a shopping job. I was in my car almost 100% of the time. Life in the car in Los Angeles during the week, is pretty much the pits with all the traffic and crazy drivers, but I managed to prevail and pull off shopping and returns! Success!!
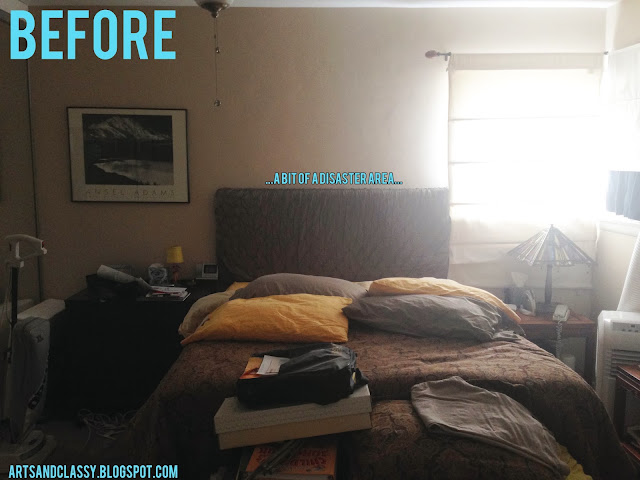
I have been hustling on some of the projects I need to finish and I am happy to show you one of them today in the form of a tutorial! My parents have a little bit of a clutter bug lifestyle (after they got married…the merging of the “stuff” is still being sorted out). Let’s take a look at the before photos!
Pretty? Oh my goodness no. But not to worry, I fixed this room up.
And now for the After!
This first step was a great one! I managed to help my parents get rid of a lot of the clutter in their room! I painted their whole room and then painted a striped accent wall! Want to find out how I did it? See below…
Supplies you will need:
(These can all be found at Lowe’s, Home Depot, and Paint Supply Store)
1. Frog Tape (for the striped wall – it has painter’s block) DO NOT USE REGULAR PAINTERS TAPE for this part.
2. Acrylic Latex Paint (in the 2 colors of your choosing and in a matte finish) I chose Valspar’s primer and paint in one to eliminate the priming step.
3. Painter’s Tape (assorted widths)
4. Paint Frame and Roller refills
5. Paint Edger
6. Angled Paint Brush
7. Drop Cloths or Plastic
The first and most important step is to clear out the room that you are painting and to mask off the floor. You will also want to tape the electrical outlets to prevent them from being painted. This step can feel like it may take as long as the painting itself, but trust me it’s better to prevent paint from going everywhere that you don’t want it to.
Next, you will start painting with one color you chose. I started with Valspar’s “high society” and painted their whole room that one color.
After that step, I began measuring out where I wanted my to tape out my stripes.
My measuring method:
Begin with measuring the floor to ceiling = 100 inches
With the number you measure, you will take that number and divide it by the number of stripes you want on the wall.
100 (inches)/8(stripes) = 12.5″ per stripe
When you measure your stripes take into consideration the width of the frog tape you use and include that width in your measurement.
(this can be a frustrating act – so take your time)
Once I made my marks on where I wanted to stripes to be. I laid the frog tape on the wall.
Then I applied my second color “Rain Puddle” to the taped-off stripe area. I applied 2 – 3 coats to make sure there was full coverage.
Then once you let it dry (preferably overnight) and then remove the frog tape.
Step 1 is complete! I think we are moving in the right direction! Please stay tuned for the next step in a couple of days. 🙂 I hope you learned a new painting trick today and that this will inspire you to define your space in your own way! Good luck!
**Update** Check out Part 2 of this series My Parents Room Makeover – DIY Ceiling Light Tutorial and Part 3: Circular Mirror Makeover.
Some other posts you will enjoy…

