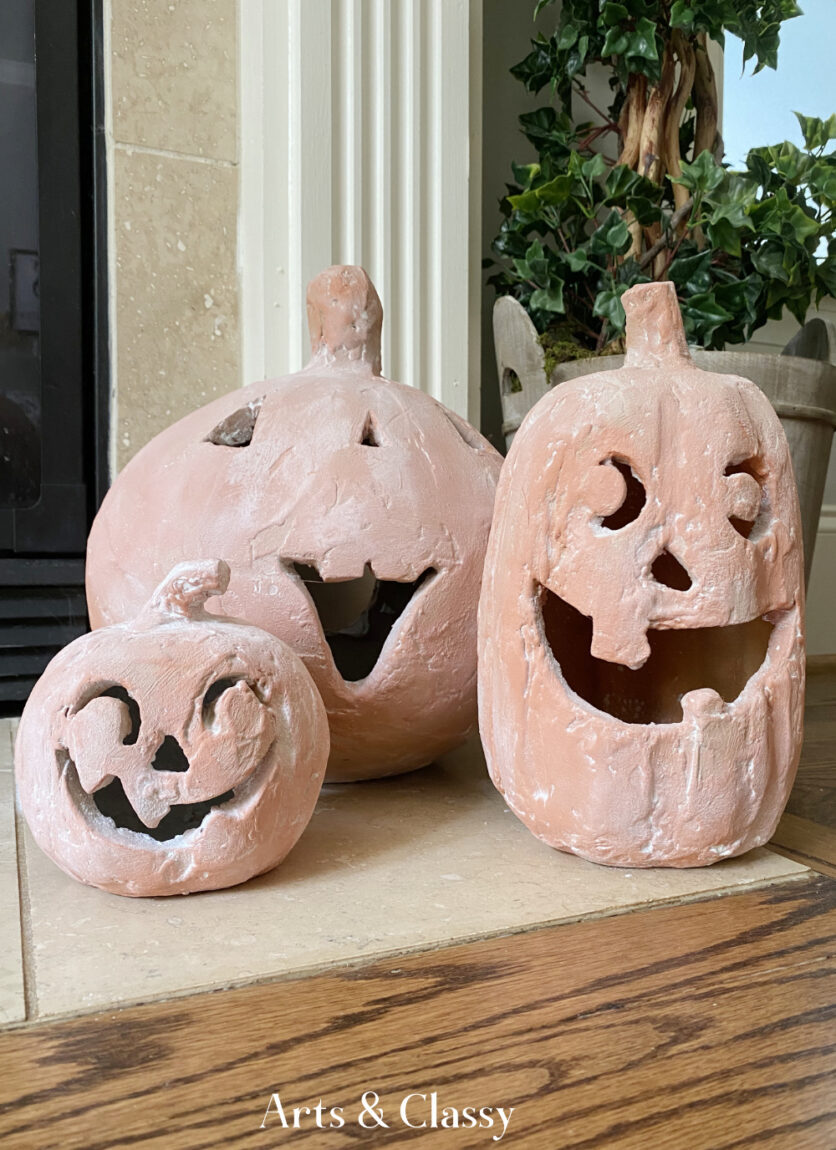
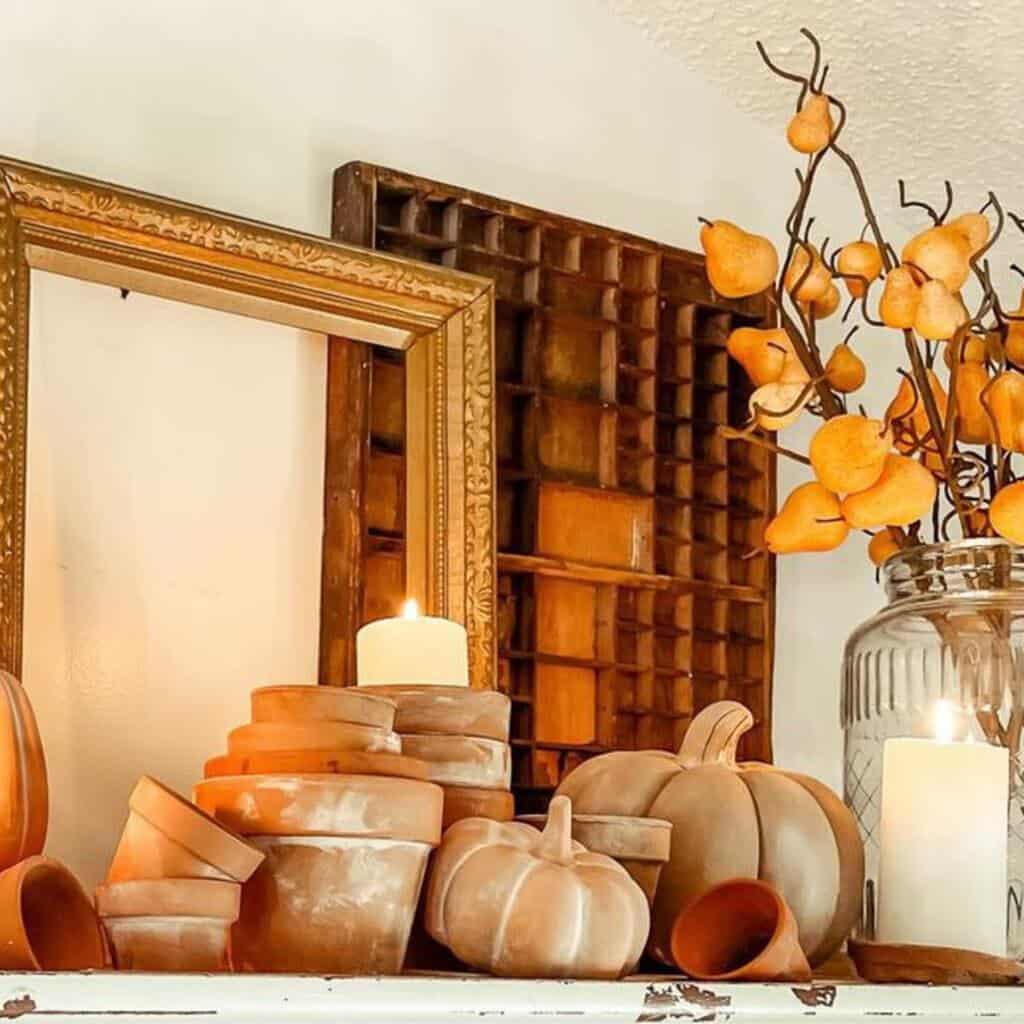
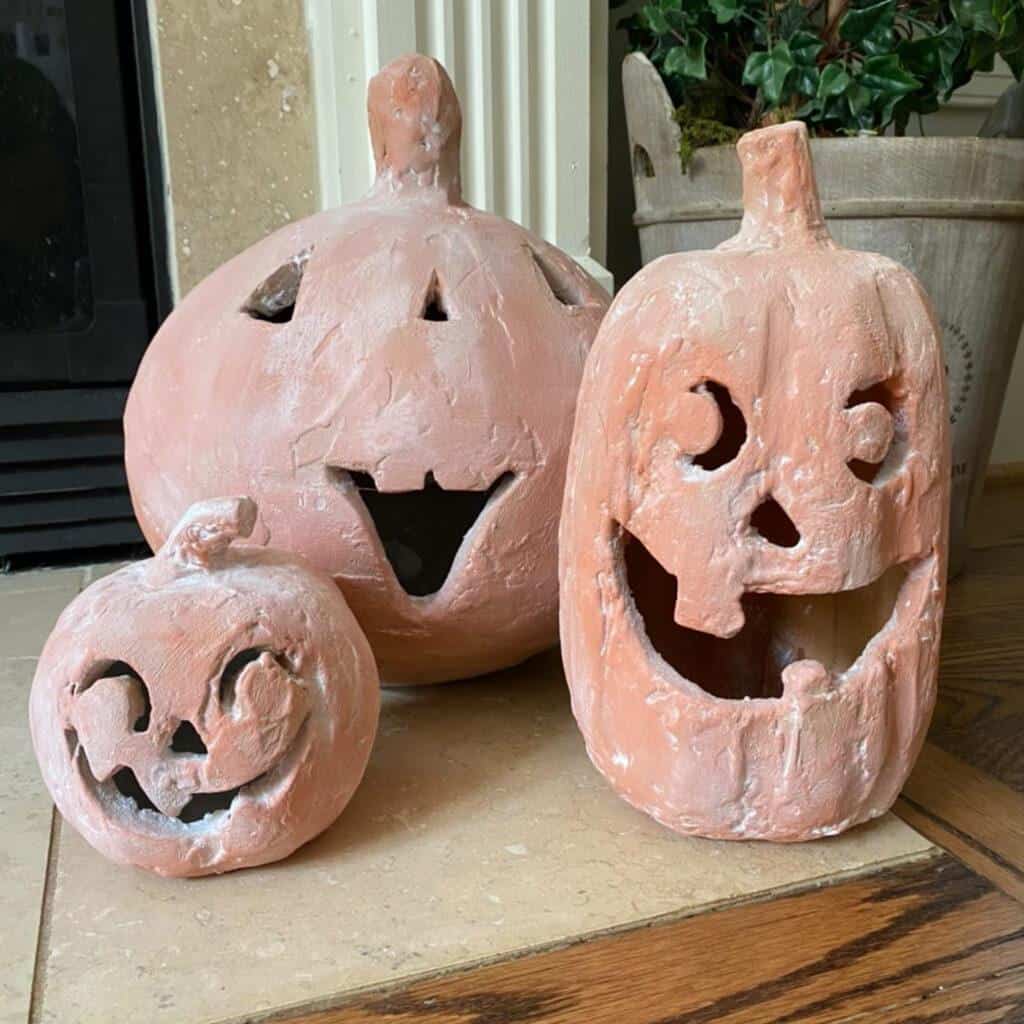
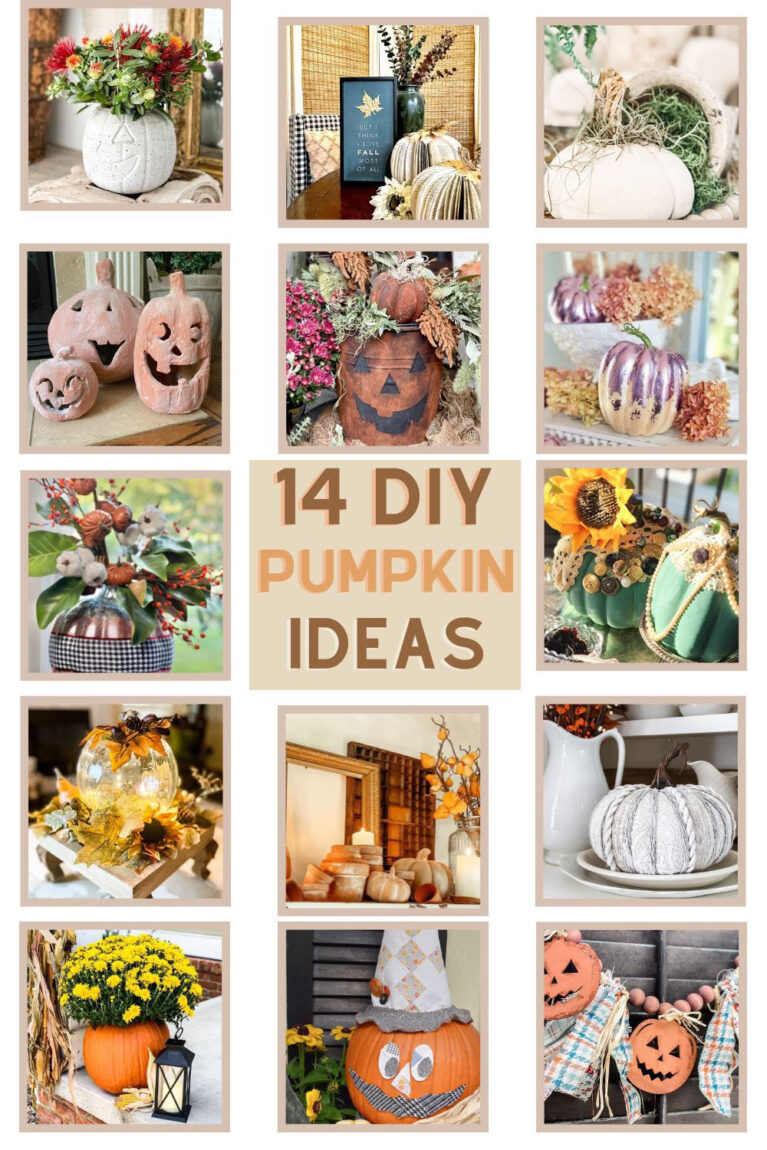
Terracotta Pumpkins DIY: My Easy Pottery Barn Dupe
If you are coming from Missy’s blog Sonata Home Design, Welcome. I am so glad you are here. I am sure you enjoyed all of the fabulous pumpkin inspiration that Missy shared with you.
What are terracotta pumpkins, and how do you DIY the Pottery Barn look?
Terracotta pumpkins are faux pumpkins coated in a textured terracotta-style finish using spackle, paint, baking soda, and baby powder. This DIY mimics the Pottery Barn originals using supplies you likely already own.
This simple project is perfect for any skill level, and the results are stunning. So get ready to get crafty, and transform your home into a pumpkin-filled haven this fall!
Quick Terracotta Pumpkin DIY
Fake pumpkin + spackle → texture
Sand + mix paint + baking soda → terracotta tone
Dust with baby powder → matte finish
This post contains some affiliate links. I may earn a small commission if you purchase through one of these links. See more information in my disclosure policy.
Here’s what you’ll need to make your Pottery Barn terracotta pumpkin dupe:
- A fake pumpkin of any material – I am using one I already had from a previous Halloween that I didn’t really love. This was the perfect project piece. I also found 2 other smaller fake Jack-o-Lantern plastic pumpkins at Joann’s.
- Spackle
- Palette knife
- DecoArt Terracotta craft paint set – it includes a variety of paint colors in the shades of clay and terracotta color.
- Baking soda
- Gator micro sanding tool
- Paint brushes
- Baby Powder
Shop the supplies for this DIY terracotta pumpkins project if you don’t have them in your craft supply closet

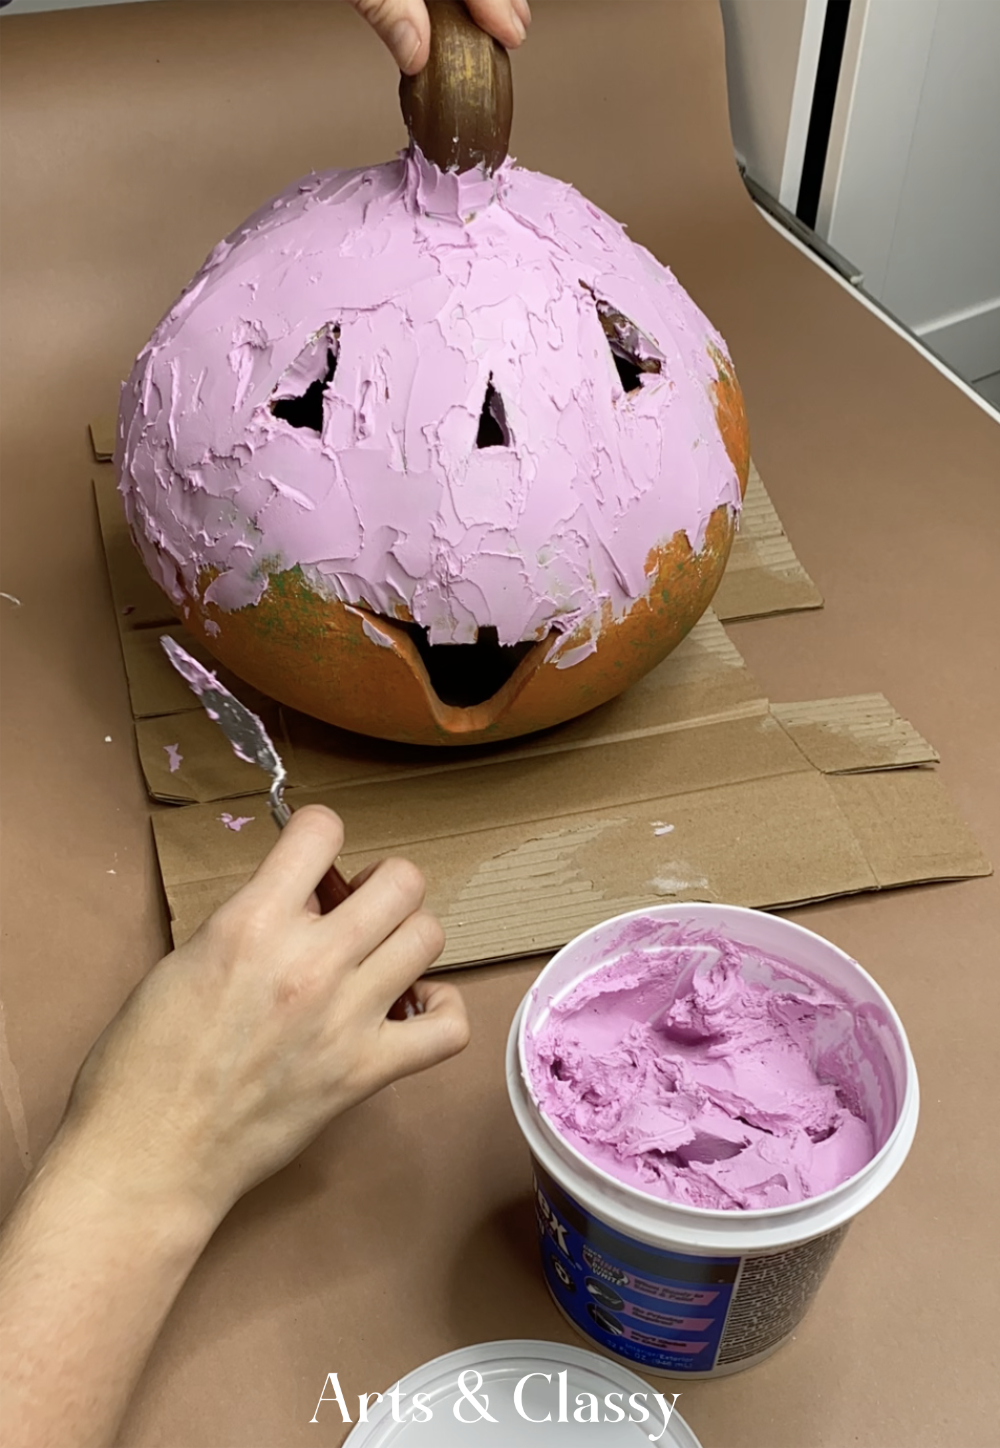
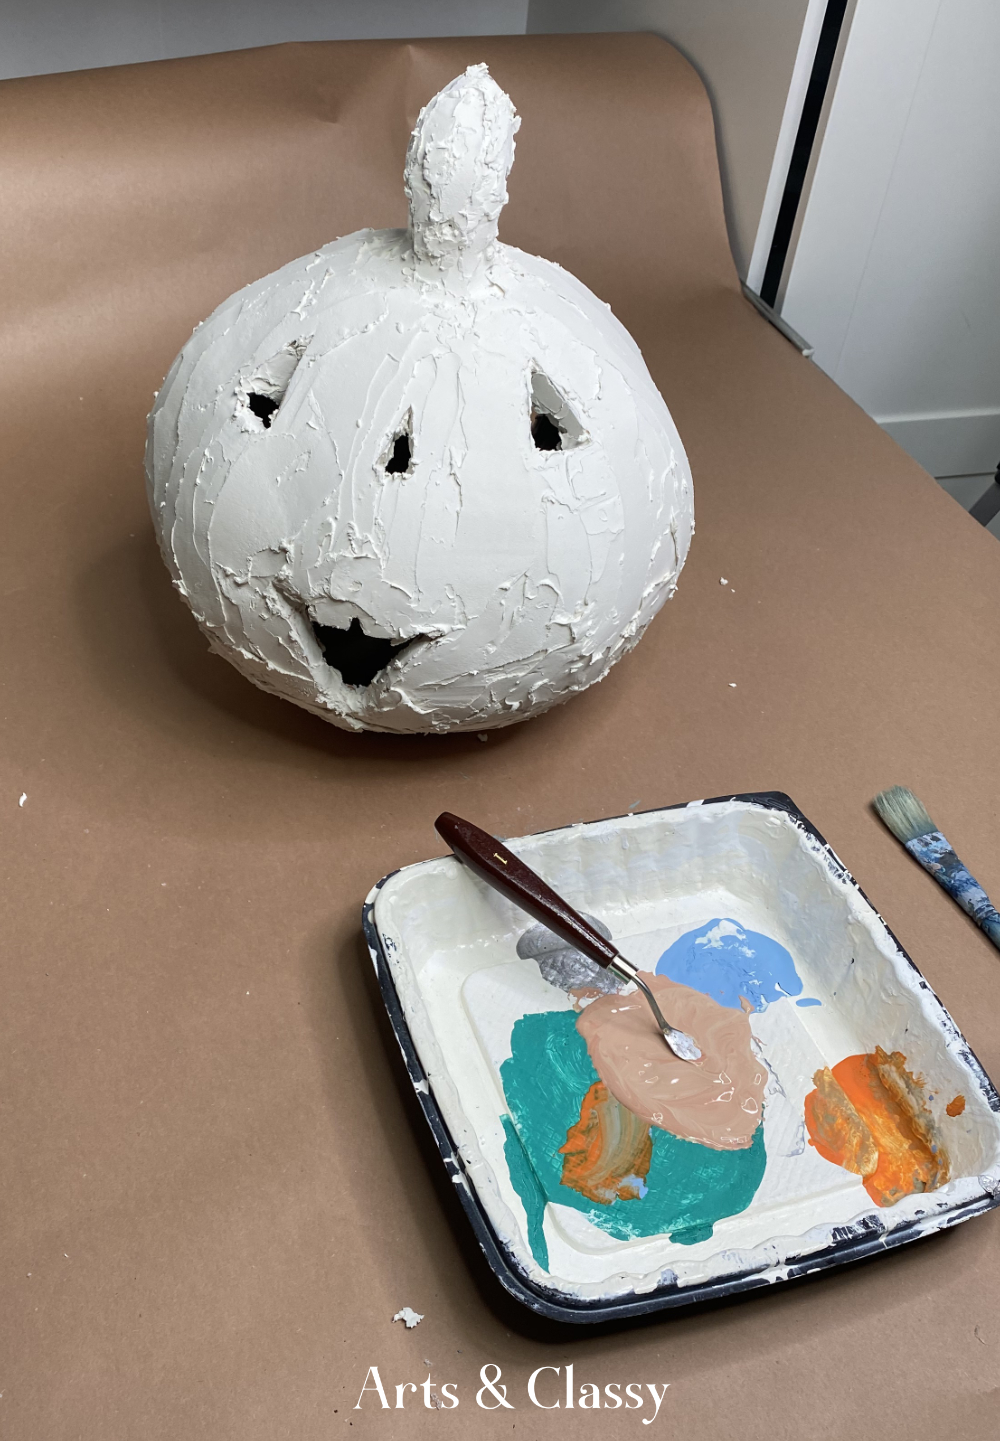
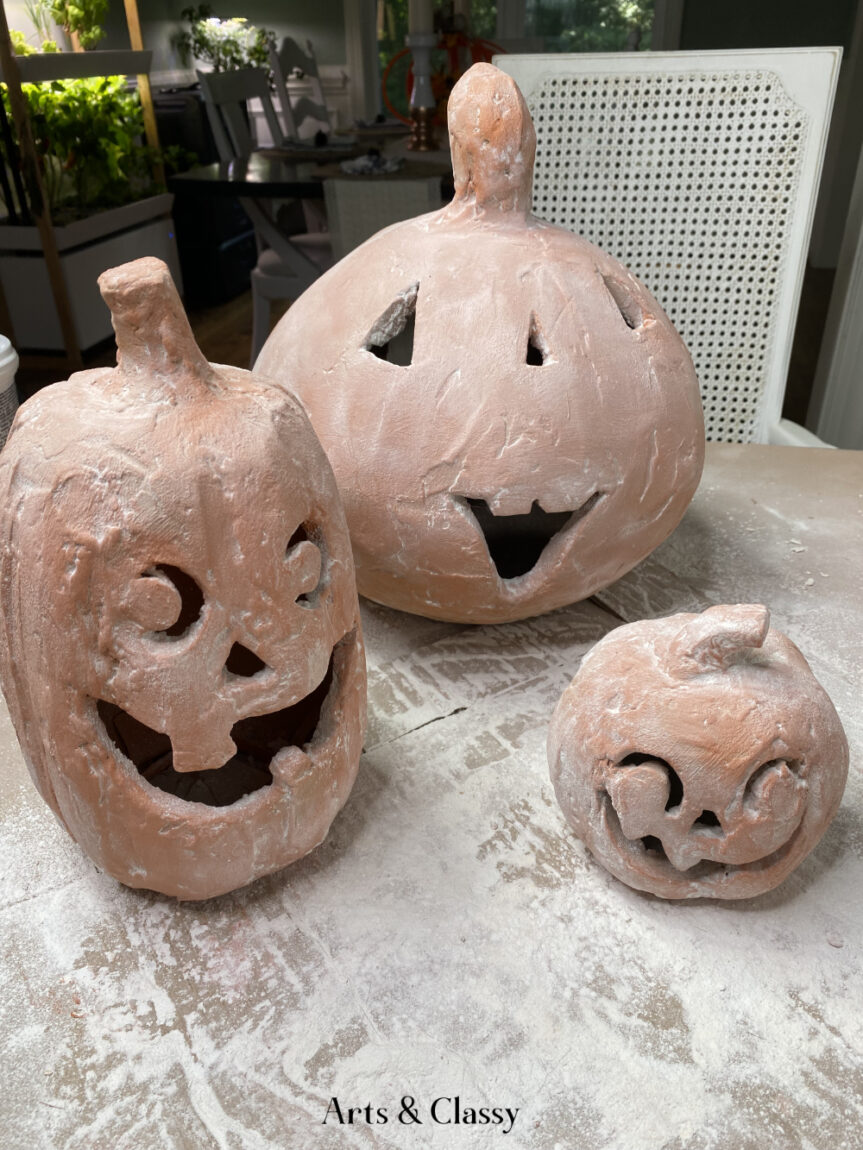
Step 1: Texture your pumpkin for a terracotta finish
These festive decorations are perfect for adding a touch of autumnal flavor to any space. And best of all, they’re surprisingly easy to make. Just grab some spackle and get started.
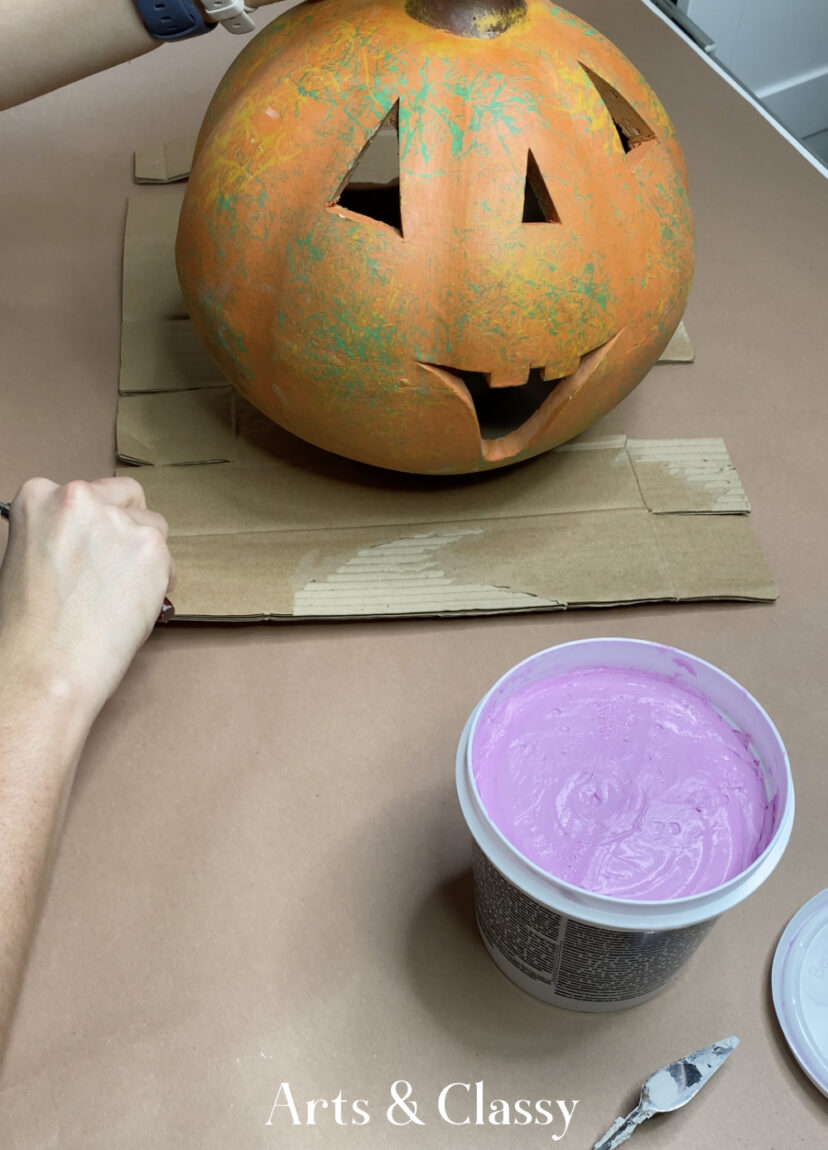
Don’t be afraid to add a rougher texture to your spackle during this process. Allow it to dry completely. I like using Drydex spackle because it starts as a bright pink but turns white when it has dried completely. Once your pumpkin is dry, you can simply set it out on your doorstep or mantel and enjoy the season.
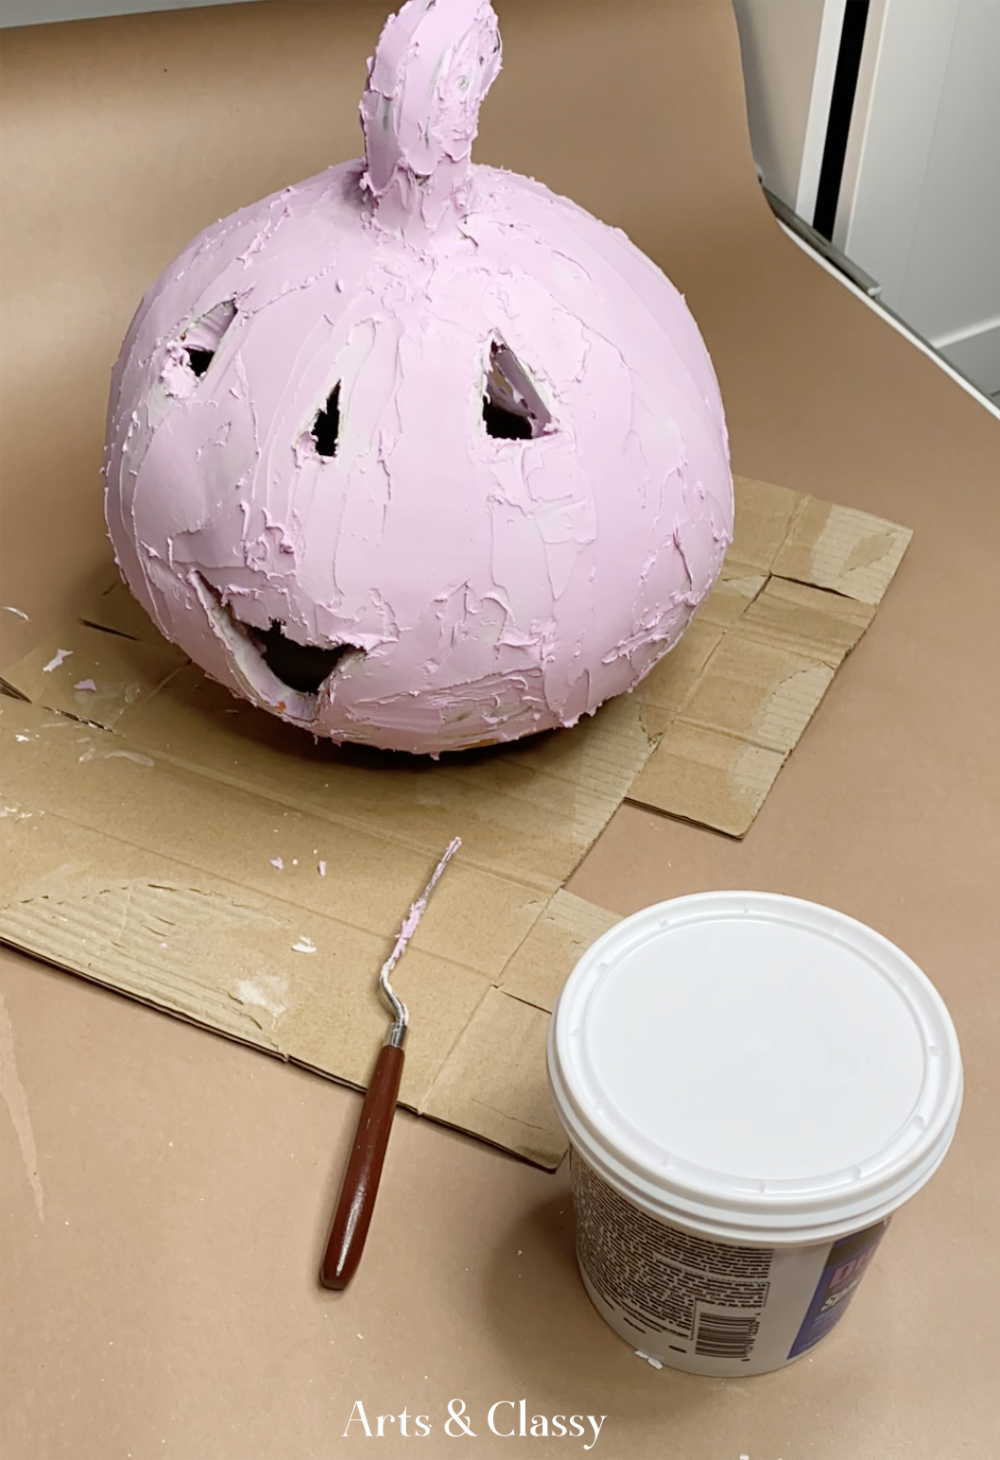
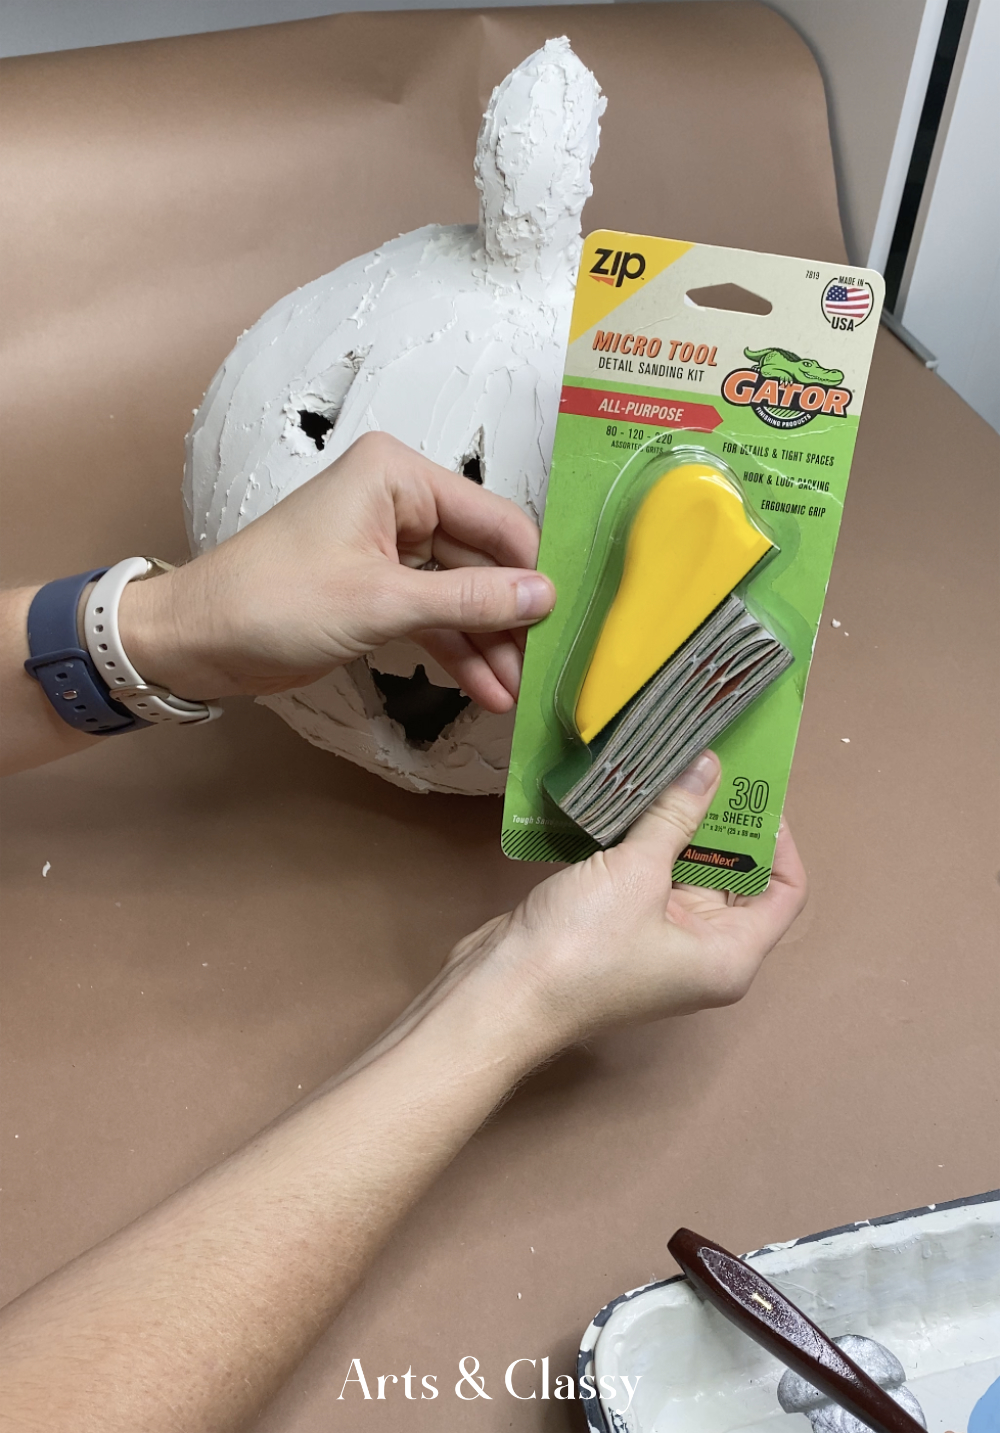
Step 2: Sand down the spackle on the faux pumpkin surface.
With a little bit of sanding, you can transform this pumpkin into a work of art. The Gator micro sanding tool is the perfect tool for the job. It’s designed to sand down the rougher edges, and it gives the pumpkin a terracotta-like texture that looks realistic.
RELATED: 5 Simple DIY Ways to Transform Your Home for Halloween
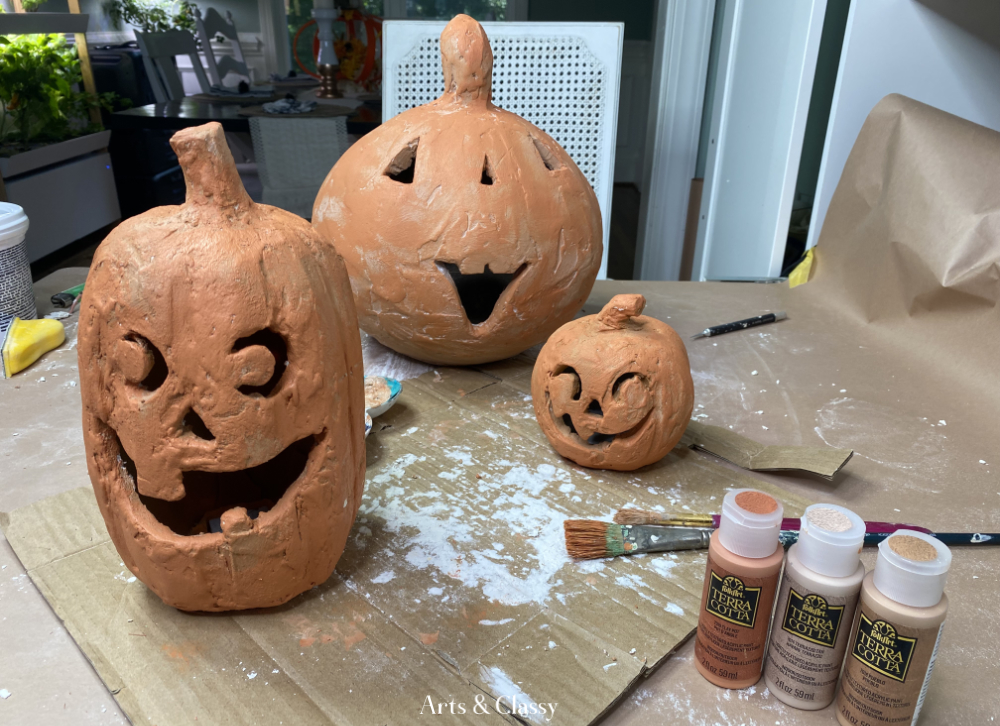
Step 3: Paint terracotta pumpkins
Acrylic paint is a versatile medium that can be used to create a variety of looks. For this project, we’re going to use it to create a faux terracotta finish on a pottery barn pumpkin.
Begin by mixing baking soda into the paint, and cover the entire pumpkin with the DecoArt Terracotta paint.
Allow the paint to dry completely before displaying your finished pumpkin. You can easily transform a store-bought pumpkin into a work of art with just a few simple steps.
RELATED: 21 Budget-Friendly & Cozy Fall Decor Ideas For The Home
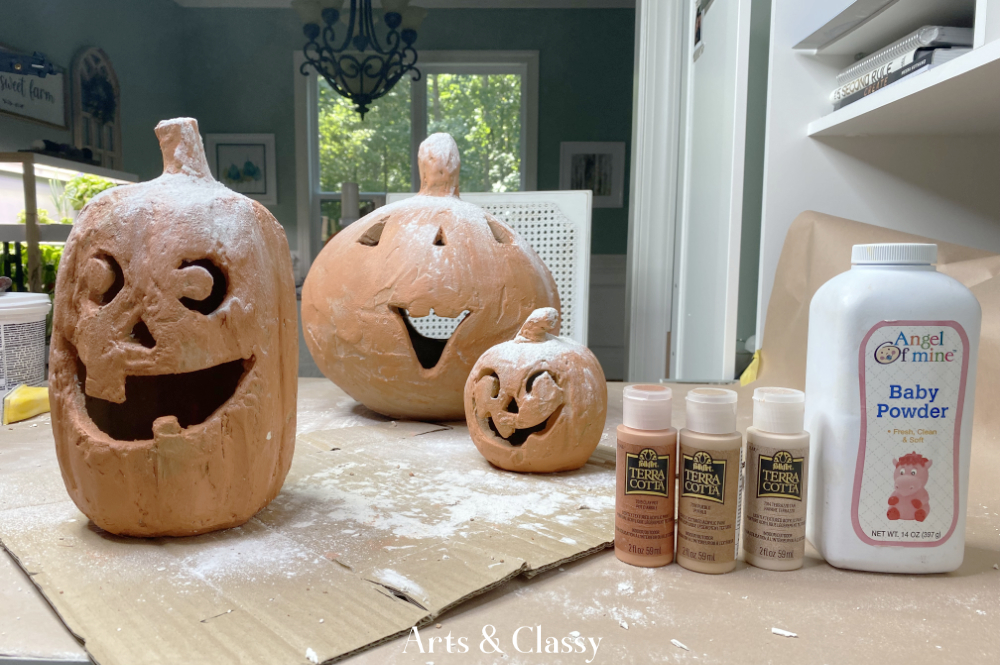
Step 4: Sprinkle, dust, and brush baby powder
One easy way to add some extra dimension to your pumpkin is to dust it with baby powder. I have also seen other creators use excess flour instead. First, you’ll want to find a Pottery Barn pumpkin that’s the perfect size for your home.
Then, simply brush on a thin layer of baby powder.
The powder will help to create a matte finish that will catch the light in unique ways. Plus, it’s a fun and easy way to add some extra Halloween flair to your decor. So if you’re looking for a quick and easy way to take your pumpkin decor up a notch, try dusting it with baby powder.
RELATED: 15 Cheap Rustic Fall Decor Ideas From Amazon
Well friends, there you have it! My take on the Pottery Barn terracotta pumpkins. I hope you give this a try – it’s really easy and the results are fantastic.
Be sure to tag me in your photos on Instagram and Pinterest for more ideas.
Also, I am participating in a blog hop with some talented other DIY and home bloggers. Make sure to check out their projects linked below.
I hope you enjoyed my DIY Pottery Barn Pumpkin, and now it is time to move on to Kristy’s amazing pumpkin DIY project. You won’t believe what she has in store for you! Thanks for reading and happy crafting!


Like this project? Save it to your Pinterest boards!
If you want to see more inspiring Fall Decor ideas, make sure you are following my Pinterest.

Meredith, These are AMAZING!!!! They look so flippin’ good! Ahhhh, baby powder…I used crushed chalk on mine but baby powder is such a good idea!!
You are too kind, Jennifer!! It ended up exceeding my expectations and with DIY that is the best feeling right? Thanks for stopping by and for your kind feedback. You’re the best!
These look so good and the perfect dupe! Nice hopping with you today! Happy fall!
It was so fun hopping with you, Kim! Thanks for stopping by and for your nice comment. 🙂
The texture is really cool on these and the baby powder looks so legit terra cotta. Great project!
Thank you so much for taking the time to stop by and leave your positive feedback, Lora!
I love your amazing Pottery Barn Pumpkin Dupes, Meredith! I never ever would’ve guessed you used baby powder to give them that dusted look…very clever, my friend!
You are so sweet, Kristy! Thank you very much. Baby powder ended up exceeding my expectations. It’s always an adventure with DIY. Especially, when you are trying to use things you already have in your craft supply or bathroom cabinet. 🙂
Such an amazing, dupe, Meredith! Your pumpkins have so much personality! Really great tutorial and completed look! Perfect for Halloween and all sorts of Fall fun! Nice hopping with you! ~Missy
Thank you so much for taking the time to stop by and leave your positive feedback, Missy! It was a fun hop!
Meredith, these are just darling. You are so creative and I love the texture you gave the pumpkins.
Thank you for joining in on the fun, I hope you liked it. We will do it again.
Thank you so much for taking the time to stop by and leave your positive feedback, Wendy! You are very kind! It was a fun hop! Thank you for including me. 🙂
Meredith I love this Pottery Barn dupe! The way the spackle lays and kind of drips gives them so much character. The baby powder finish is perfect!!! So happy to hop along with you!
You are so sweet, Crystal! Thank you very much. Baby powder ended up exceeding my expectations. It’s always an adventure with DIY. Especially, when you are trying to use things you already have in your craft supply or bathroom cabinet. 🙂
This is such a cute project, Meredith! I love it! Great to hop with you for all things pumpkin!
Thank you so much for taking the time to stop by and leave your positive feedback, Susan! It was a fun hop! I loved seeing everyone’s beautiful projects!
Great job on your Pottery Barn dupe! I’d love for you to start sharing at the Home Matters Party every Thursday (9pm est) through Monday. Hope to see you there!
AWESOME tutorial, Meredith!
I’d love for you to join us over at the Creative Crafts Linky Party every Wednesday through Sunday
https://creativelybeth.com/team-creative-crafts-linky-party/
Followed and Pinned! 🙂
Creatively, Beth
Thank you for the kind feedback and for the invite! I will put your linky party on list to add content to! Looking forward to it!
So cute! I love the texture on these pumpkins